pycharmers.opencv.cvui module
A (very) simple UI lib built on top of OpenCV drawing primitives. Version: 2.7
Use of cvui revolves around calling cvui.init() to initialize the lib, rendering cvui components to a np.ndarray (that you handle yourself) and finally showing that np.ndarray on the screen using cvui.imshow(), which is cvui’s version of cv2.imshow(). Alternatively you can use cv2.imshow() to show things, but in such case you must call cvui.update() yourself before calling cv.imshow().
Read the full documentation at cvui - (very) simple UI lib built on top of OpenCV drawing primitives
Copyright (c) 2018 Fernando Bevilacqua Licensed under the MIT license.
-
pycharmers.opencv.cvui.init(windowNames='2021-07-08@23.54.06', numWindows=1, delayWaitKey=- 1, createNamedWindows=True)[source]¶ Initialize cvui using a list of names of windows where components will be added.
It is also possible to tell cvui to handle OpenCV’s event queue automatically (by informing a value greater than zero in the delayWaitKey parameter of the function).
In that case, cvui will automatically call
cv2.waitKey()withincvui.update(), so you don’t have to worry about it. The value passed to delayWaitKey will be used as the delay for cv2.waitKey().- Parameters
windowNames (str,list) – Array containing the name of the windows where components will be added. Those windows will be automatically if
createNamedWindowsisTrue.numWindows (int) – How many window names exist in the
windowNamesarray.delayWaitKey (int) – Delay value passed to
cv2.waitKey(). If a negative value is informed (default is-1), cvui will not automatically callcv2.waitKey()withincvui.update(), which will disable keyboard shortcuts for all components. If you want to enable keyboard shortcut for components (e.g. using & in a button label), you must specify a positive value for this param.createNamedWindows (bool) – If OpenCV windows named according to windowNames should be created during the initialization. Windows are created using
cv2.namedWindow(). If this parameter isFalse, ensure you callcv2.namedWindow(WINDOW_NAME)for all windows before initializing cvui, otherwise it will not be able to track UI interactions.
Examples
>>> import cv2
>>> import numpy as np
>>> from pycharmers.opencv import cvui
>>> from pycharmers.__meta__ import __version__
...
>>> WINDOW_NAME = "CVUI Test"
>>> frame = np.zeros((300, 600, 3), np.uint8)
>>> checked = [False]
>>> checked2 = [True]
>>> count = [0]
>>> countFloat = [0.0]
>>> trackbarValue = [0.0]
>>> cvui.init(WINDOW_NAME)
...
>>> while (True):
...     # Fill the frame with a nice color
...     frame[:] = (49, 52, 49)
...
...     # Show some pieces of text.
...     cvui.text(frame, 50, 30, "Hey there!")
...
...     # You can also specify the size of the text and its color
...     # using hex 0xRRGGBB CSS-like style.
...     cvui.text(frame, 200, 30, "Use hex 0xRRGGBB colors easily", fontScale=0.4, color=0xff0000)
...
...     # Sometimes you want to show text that is not that simple, e.g. strings + numbers.
...     # You can use cvui.printf for that. It accepts a variable number of parameter, pretty
...     # much like printf does.
...     cvui.printf(frame, 200, 50, fontScale=0.4, color=0x00ff00, fmt="Use printf formatting: %d + %.2f = %f", fmtArgs=(2, 3.2, 5.2))
...
...     # Buttons will return true if they were clicked, which makes
...     # handling clicks a breeze.
...     if cvui.button(frame, 50, 60, "Button"):
...             print("Button clicked")
...
...     # If you do not specify the button width/height, the size will be
...     # automatically adjusted to properly house the label.
...     cvui.button(frame, 200, 70, "Button with large label")
...
...     # You can tell the width and height you want
...     cvui.button(frame, 410, 70, "x", 15, 15)
...
...     # Window components are useful to create HUDs and similars. At the
...     # moment, there is no implementation to constraint content within a
...     # a window.
...     cvui.window(frame, 50, 120, 120, 100, "Window")
...
...     # The counter component can be used to alter int variables. Use
...     # the 4th parameter of the function to point it to the variable
...     # to be changed.
...     cvui.counter(frame, 200, 120, count)
...
...     # Counter can be used with doubles too. You can also specify
...     # the counter's step (how much it should change
...     # its value after each button press), as well as the format
...     # used to print the value.
...     cvui.counter(frame, 320, 120, countFloat, 0.1, "%.1f")
...
...     # The trackbar component can be used to create scales.
...     # It works with all numerical types (including chars).
...     cvui.trackbar(frame, 420, 110, 150, trackbarValue, 0., 50.)
...
...     # Checkboxes also accept a pointer to a variable that controls
...     # the state of the checkbox (checked or not). cvui.checkbox() will
...     # automatically update the value of the boolean after all
...     # interactions, but you can also change it by yourself. Just
...     # do "checked = [True]" somewhere and the checkbox will change
...     # its appearance.
...     cvui.checkbox(frame, 200, 160, "Checkbox", checked)
...     cvui.checkbox(frame, 200, 190, "A checked checkbox", checked2)
...
...     # Display the lib version at the bottom of the screen
...     cvui.printf(frame, 600-150, 300-20, fontScale=0.4, color=0xCECECE, fmt="pycharmers v.%s", fmtArgs=(__version__))
...
...     # This function must be called *AFTER* all UI components. It does
...     # all the behind the scenes magic to handle mouse clicks, etc.
...     cvui.update()
...
...     # Show everything on the screen
...     cv2.imshow(WINDOW_NAME, frame)
...
...     # Check if ESC key was pressed
...     if cv2.waitKey(20) == cvui.ESCAPE:
...             break
>>> cv2.destroyWindow(WINDOW_NAME)
-
pycharmers.opencv.cvui.watch(windowName, createNamedWindow=True)[source]¶ Track UI interactions of a particular window. This function must be invoked for any window that will receive cvui components. cvui automatically calls
cvui.watch()for any window informed in cvui.init(), so generally you don’t have to watch them yourself. If you initialized cvui and told it not to create windows automatically, you need to callcvui.watch()on those windows yourself.cvui.watch()can automatically create a window before watching it, if it does not exist.- Parameters
windowName (str) – Name of the window whose UI interactions will be tracked.
createNamedWindow (bool) – If an OpenCV window named
windowNameshould be created before it is watched. Windows are created usingcv2.namedWindow(). If this parameter isFalse, ensure you have calledcv2.namedWindow(WINDOW_NAME)to create the window, otherwise cvui will not be able to track its UI interactions.
-
pycharmers.opencv.cvui.context(windowName)[source]¶ Inform cvui that all subsequent component calls belong to a window in particular. When using cvui with multiple OpenCV windows, you must call cvui component calls between
cvui.contex(NAME)andcvui.update(NAME), whereNAMEis the name of the window. That way, cvui knows which window you are using (NAMEin this case), so it can track mouse events, for instance.Pay attention to the pair
cvui.context(NAME)andcvui.update(NAME), which encloses the component calls for that window. You need such pair for each window of your application.After calling
cvui.update(), you can show the result in a window usingcv2.imshow(). If you want to save some typing, you can usecvui.imshow(), which callscvui.update()for you and then shows the frame in a window.In that case, you don’t have to bother calling
cvui.update()yourself, sincecvui.imshow()will do it for you.- Parameters
windowName (str) – Name of the window that will receive components from all subsequent cvui calls.
-
pycharmers.opencv.cvui.imshow(windowName, frame)[source]¶ Display an image in the specified window and update the internal structures of cvui. This function can be used as a replacement for
cv2.imshow(). If you want to usecv2.imshow()instead ofcvui.imshow(), you must ensure you callcvui.update()after all component calls and beforecv2.imshow(), so cvui can update its internal structures.In general, it is easier to call
cvui.imshow()alone instead of callingcvui.update()immediately followed bycv2.imshow().- Parameters
windowName (str) – Name of the window that will be shown.
frame (np.ndarray) – Image, i.e.
np.ndarray, to be shown in the window.
-
pycharmers.opencv.cvui.lastKeyPressed()[source]¶ Return the last key that was pressed. This function will only work if a value greater than zero was passed to
cvui.init()as the delay waitkey parameter.
-
pycharmers.opencv.cvui.iarea(x, y, width, height)[source]¶ Create an interaction area that reports activity with the mouse cursor. The tracked interactions are returned by the function and they are:
cvui.OUTwhen the cursor is not over the iarea.cvui.OVERwhen the cursor is over the iarea.cvui.DOWNwhen the cursor is pressed over the iarea, but not released yet.cvui.CLICKwhen the cursor clicked (pressed and released) within the iarea.
This function creates no visual output on the screen. It is intended to be used as an auxiliary tool to create interactions.
- Parameters
x (int) – Position X where the interactive area should be placed.
y (int) – Position Y where the interactive area should be placed.
width (int) – Width of the interactive area.
height (int) – Height of the interactive area.
- Returns
- An integer value representing the current state of interaction with the mouse cursor. It can be
cvui.OUTwhen the cursor is not over the iarea.cvui.OVERwhen the cursor is over the iarea.cvui.DOWNwhen the cursor is pressed over the iarea, but not released yet.cvui.CLICKwhen the cursor clicked (pressed and released) within the iarea.
- Return type
int
Examples
>>> import cv2
>>> import numpy as np
>>> from pycharmers.opencv import cvui
...
>>> WINDOW_NAME = 'Interaction area'
>>> frame = np.zeros((300, 600, 3), np.uint8)
>>> cvui.init(WINDOW_NAME)
>>> rectangle = cvui.Rect(50, 50, 100, 100)
...
>>> while (True):
...     # Fill the frame with a nice color
...     frame[:] = (49, 52, 49)
...
...     # Render a rectangle on the screen.
...     cvui.rect(frame, rectangle.x, rectangle.y, rectangle.width, rectangle.height, 0xff0000)
...
...     # Check what is the current status of the mouse cursor
...     # regarding the previously rendered rectangle.
...     status = cvui.iarea(rectangle.x, rectangle.y, rectangle.width, rectangle.height);
...
...     # cvui.iarea() will return the current mouse status:
...     #  CLICK : mouse just clicked the interaction are
...     #  DOWN  : mouse button was pressed on the interaction area, but not released yet.
...     #  OVER  : mouse cursor is over the interaction area
...     #  OUT   : mouse cursor is outside the interaction area
...     if status == cvui.CLICK:  print('Rectangle was clicked!')
...     if status == cvui.DOWN:   cvui.text(frame, 240, 70, text="Mouse is: DOWN")
...     if status == cvui.OVER:   cvui.text(frame, 240, 70, text="Mouse is: OVER")
...     if status == cvui.OUT:    cvui.text(frame, 240, 70, text="Mouse is: OUT")
...
...     # Show the coordinates of the mouse pointer on the screen
...     cvui.printf(frame, 240, 50, fmt="Mouse pointer is at (%d,%d)", fmtArgs=(cvui.mouse().x, cvui.mouse().y))
...
...     # This function must be called *AFTER* all UI components. It does
...     # all the behind the scenes magic to handle mouse clicks, etc.
...     cvui.update()
...
...     # Show everything on the screen
...     cv2.imshow(WINDOW_NAME, frame)
...
...     # Check if ESC key was pressed
...     if cv2.waitKey(20) == cvui.ESCAPE:
...             break
>>> cv2.destroyWindow(WINDOW_NAME)
-
pycharmers.opencv.cvui.space(value=5)[source]¶ Add an arbitrary amount of space between components within a
begin*()andend*()block. The function is aware of context, so if it is used within a beginColumn() and endColumn() block, the space will be vertical. If it is used within a beginRow() and endRow() block, space will be horizontal.NOTE: This function can only be used within a
begin*()/end*()block, otherwise it does nothing.- Parameters
value (int) – The amount of space to be added.
-
pycharmers.opencv.cvui.update(windowName='')[source]¶ Update the library internal things. You need to call this function AFTER you are done adding/manipulating UI elements in order for them to react to mouse interactions.
- Parameters
windowName (str) – Name of the window whose components are being updated. If no window name is provided, cvui uses the default window.
-
pycharmers.opencv.cvui.text(where=None, x=0, y=0, text='', fontFace=0, fontScale=0.4, color=13553358, thickness=1, lineType=8)[source]¶ Display a piece of text.
- Parameters
where (np.ndarray) – image/frame where the component should be rendered.
x (int) – Position X where the component should be placed.
y (int) – Position Y where the component should be placed.
text (str) – The text content.
fontFace (int) – Font type. (default=
cv2.FONT_HERSHEY_SIMPLEX)fontScale (float) – Font scale factor that is multiplied by the font-specific base size.
color (uint) – Color of the text in the format
0xRRGGBB, e.g.0xff0000for red.thickness (int) – Thickness of the lines used to draw a text.
lineType (int) – Line type. (default=
cv2.LINE_8)
Examples
>>> import cv2
>>> import numpy as np
>>> from pycharmers.opencv import cvui
...
>>> WINDOW_NAME = "Text"
>>> frame = np.zeros(shape=(50, 100, 3), dtype=np.uint8)
>>> cvui.init(WINDOW_NAME)
...
>>> while (True):
...     frame[:] = (49, 52, 49)
...     cvui.text(where=frame, x=10, y=20, text="Hey there!")
...     cvui.update()
...     cv2.imshow(WINDOW_NAME, frame)
...     if cv2.waitKey(20) == cvui.ESCAPE:
...             break
>>> cv2.destroyWindow(WINDOW_NAME)
-
pycharmers.opencv.cvui.printf(where=None, x=0, y=0, fontFace=0, fontScale=0.4, color=13553358, thickness=1, lineType=8, fmt='Text: %s', fmtArgs='')[source]¶ Display a piece of text that can be formated using
C stdio's printf()style. For instance if you want to display text mixed with numbers, you can use:>>> print("Text: %d and %f" % (7, 3.1415))
- Parameters
where (np.ndarray) – image/frame where the component should be rendered.
x (int) – Position X where the component should be placed.
y (int) – Position Y where the component should be placed.
fontFace (int) – Font type. (default=
cv2.FONT_HERSHEY_SIMPLEX)fontScale (float) – Font scale factor that is multiplied by the font-specific base size.
color (uint) – Color of the text in the format
0xRRGGBB, e.g.0xff0000for red.thickness (int) – Thickness of the lines used to draw a text.
lineType (int) – Line type. (default=
cv2.LINE_8)fmt (str) – Formating string as it would be supplied for stdio’s
printf(), e.g.'Text: %d and %f', 7, 3.1415.fmtArgs (tuple) – Arguments for
fmt.
Examples
>>> import cv2
>>> import numpy as np
>>> from pycharmers.opencv import cvui
>>> from pycharmers.utils import now_str
...
>>> WINDOW_NAME = 'Printf'
>>> frame = np.zeros(shape=(50, 250, 3), dtype=np.uint8)
>>> cvui.init(WINDOW_NAME)
...
>>> while (True):
...     frame[:] = (49, 52, 49)
...     cvui.printf(frame, 20, 20, fontScale=0.4, color=0xCECECE, fmt="Date: %s", fmtArgs=(now_str()))
...     cvui.update()
...     cv2.imshow(WINDOW_NAME, frame)
...     if cv2.waitKey(20) == cvui.ESCAPE:
...             break
-
pycharmers.opencv.cvui.counter(where=None, x=0, y=0, value=[], step=1, fmt='')[source]¶ Display a counter for integer values that the user can increase/descrease by clicking the up and down arrows.
- Parameters
where (np.ndarray) – image/frame where the component should be rendered.
x (int) – Position X where the component should be placed.
y (int) – Position Y where the component should be placed.
value ([number]) – Array or List of numbers whose first position, i.e.
value[0], will be used to store the current value of the counter.step (number) – Amount that should be increased/decreased when the user interacts with the counter buttons
fmt (str) – How the value of the counter should be presented, as it was printed by
stdio's printf(). E.g.'%d'means the value will be displayed as an integer,'%0d'integer with one leading zero, etc.
- Returns
Number that corresponds to the current value of the counter.
- Return type
value (number)
Examples
>>> import cv2
>>> import numpy as np
>>> from pycharmers.opencv import cvui
>>> from pycharmers.utils import now_str
...
>>> WINDOW_NAME = 'Text'
>>> frame = np.zeros(shape=(100, 150, 3), dtype=np.uint8)
>>> cvui.init(WINDOW_NAME)
>>> countFloat = [0.]
...
>>> while (True):
...     frame[:] = (49, 52, 49)
...     cvui.counter(frame, 10, 10, countFloat, 0.1, '%.1f')
...     cvui.printf(frame,  10, 50, fontScale=0.4, color=0xCECECE, fmt="Current value: %.1f", fmtArgs=(countFloat[0]))
...     cvui.update()
...     cv2.imshow(WINDOW_NAME, frame)
...     if cv2.waitKey(20) == cvui.ESCAPE:
...             break
>>> cv2.destroyWindow(WINDOW_NAME)
-
pycharmers.opencv.cvui.checkbox(where=None, x=0, y=0, label='', state=[], color=13553358)[source]¶ Display a checkbox. You can use the state parameter to monitor if the checkbox is checked or not.
- Parameters
where (np.ndarray) – image/frame where the component should be rendered.
x (int) – Position X where the component should be placed.
y (int) – Position Y where the component should be placed.
label (str) – Text displayed besides the clickable checkbox square.
state ([bool]) – Array or List of booleans whose first position, i.e.
state[0], will be used to store the current state of the checkbox:Truemeans the checkbox is checked.color (uint) – Color of the label in the format
0xRRGGBB, e.g.0xff0000for red.
- Returns
Whether the current state of the checkbox,
Trueif it is checked.- Return type
value (bool)
Examples
>>> import cv2
>>> import numpy as np
>>> from pycharmers.opencv import cvui
>>> from pycharmers.utils import now_str
...
>>> WINDOW_NAME = 'Check Box'
>>> frame = np.zeros(shape=(100, 150, 3), dtype=np.uint8)
>>> cvui.init(WINDOW_NAME)
>>> checked = [True]
...
>>> while (True):
...     frame[:] = (49, 52, 49)
...     cvui.checkbox(frame, 10, 10, 'Checkbox', checked)
...     cvui.printf(frame,  10, 50, fontScale=0.4, color=0xCECECE, fmt="Current value: %s", fmtArgs=(checked[0]))
...     cvui.update()
...     cv2.imshow(WINDOW_NAME, frame)
...     if cv2.waitKey(20) == cvui.ESCAPE:
...             break
>>> cv2.destroyWindow(WINDOW_NAME)
-
pycharmers.opencv.cvui.radiobox(where=None, x=0, y=0, labels=[''], states=[], color=13553358)[source]¶ Display a radiobox. You can use the
statesparameter to check which radio button is checked.- Parameters
where (np.ndarray) – image/frame where the component should be rendered.
x (int) – Position X where the component should be placed.
y (int) – Position Y where the component should be placed.
labels ([str]) – Text displayed besides the each clickable radiobox square.
states ([bool]) – Array or List of booleans whose first position, i.e.
state[0], will be used to store the current state of the checkbox:Truemeans the checkbox is checked.color (uint) – Color of the label in the format
0xRRGGBB, e.g.0xff0000for red.
- Returns
Which radio button is checked (
True).- Return type
value (int)
Examples
>>> import cv2
>>> import numpy as np
>>> from pycharmers.opencv import cvui, cv2RED, cv2BLUE, cv2GREEN
>>> from pycharmers.utils import now_str
...
>>> WINDOW_NAME = 'Radio Box'
>>> frame = np.zeros(shape=(150, 200, 3), dtype=np.uint8)
>>> cvui.init(WINDOW_NAME)
...
>>> radio_labels = ["red", "blue", "green"]
>>> radio_states = [True, False, False]
>>> bg_colors    = [cv2RED, cv2BLUE, cv2GREEN]
>>> idx = 0
...
>>> while (True):
...     frame[:] = (49, 52, 49)
...
...     cvui.beginRow(frame, x=10, y=10, width=180, height=130, bgColor=bg_colors[idx])
...     idx = cvui.radiobox(x=10, y=10, labels=radio_labels, states=radio_states)
...     cvui.printf(where=frame, x=10, y=100, fontScale=0.4, color=0xCECECE, fmt="Current bgColor: %s", fmtArgs=(radio_labels[idx]))
...     cvui.endRow()
...
...     cvui.update()
...     cv2.imshow(WINDOW_NAME, frame)
...     if cv2.waitKey(20) == cvui.ESCAPE:
...             break
>>> >>> cv2.destroyWindow(WINDOW_NAME)
-
pycharmers.opencv.cvui.mouse(windowName=None, button=None, query=None)[source]¶ Query the mouse for events in a particular button in a particular window. This function behave exactly like
mouse(int button, int query), with the difference that queries are targeted at particular mouse button in a particular window instead.- Parameters
windowName (str) – Name of the window that will be queried.
button (int) – An integer describing the mouse button to be queried. Possible values are
cvui.LEFT_BUTTON,cvui.MIDDLE_BUTTONandcvui.LEFT_BUTTON.query (int) – An integer describing the intended mouse query. Available queries are
cvui.DOWN,cvui.UP,cvui.CLICK, andcvui.IS_DOWN.
- Returns
(If
queryis None) A point containing the position of the mouse cursor in the speficied window. isMouseButton (bool) : (otherwise) Whether thebuttonandqueryare match.- Return type
point (Point)
Examples
>>> import cv2
>>> import numpy as np
>>> from pycharmers.opencv import cvui
...
>>> WINDOW_NAME = "Mouse"
>>> frame = np.zeros((300, 600, 3), np.uint8)
>>> cvui.init(WINDOW_NAME)
>>> rectangle = cvui.Rect(0, 0, 0, 0)
...
>>> while (True):
...     # Fill the frame with a nice color
...     frame[:] = (49, 52, 49)
...
...     # Show the coordinates of the mouse pointer on the screen
...     cvui.text(frame, 10, 30, 'Click (any) mouse button and drag the pointer around to select an area.')
...     cvui.printf(frame, 10, 50, fontScale=0.4, color=0xff0000, fmt='Mouse pointer is at (%d,%d)', fmtArgs=(cvui.mouse().x, cvui.mouse().y))
...
...     # The function "bool cvui.mouse(int query)" allows you to query the mouse for events.
...     # E.g. cvui.mouse(cvui.DOWN)
...     #
...     # Available queries:
...     #       - cvui.DOWN: any mouse button was pressed. cvui.mouse() returns true for a single frame only.
...     #       - cvui.UP: any mouse button was released. cvui.mouse() returns true for a single frame only.
...     #       - cvui.CLICK: any mouse button was clicked (went down then up, no matter the amount of frames in between). cvui.mouse() returns true for a single frame only.
...     #       - cvui.IS_DOWN: any mouse button is currently pressed. cvui.mouse() returns true for as long as the button is down/pressed.
...
...     # Did any mouse button go down?
...     if cvui.mouse(query=cvui.DOWN):
...             # Position the rectangle at the mouse pointer.
...             rectangle.x = cvui.mouse().x
...             rectangle.y = cvui.mouse().y
...
...     # Is any mouse button down (pressed)?
...     if cvui.mouse(query=cvui.IS_DOWN):
...             # Adjust rectangle dimensions according to mouse pointer
...             rectangle.width = cvui.mouse().x - rectangle.x
...             rectangle.height = cvui.mouse().y - rectangle.y
...
...             # Show the rectangle coordinates and size
...             cvui.printf(frame, rectangle.x    + 5, rectangle.y    + 5, fontScale=0.3, color=0xff0000, fmt='(%d,%d)',    fmtArgs=(rectangle.x, rectangle.y))
...             cvui.printf(frame, cvui.mouse().x + 5, cvui.mouse().y + 5, fontScale=0.3, color=0xff0000, fmt='w:%d, h:%d', fmtArgs=(rectangle.width, rectangle.height))
...
...     # Did any mouse button go up?
...     if cvui.mouse(query=cvui.UP):
...             # Hide the rectangle
...             rectangle.x = 0
...             rectangle.y = 0
...             rectangle.width = 0
...             rectangle.height = 0
...
...     # Was the mouse clicked (any button went down then up)?
...     if cvui.mouse(query=cvui.CLICK):
...             cvui.text(frame, 10, 70, 'Mouse was clicked!')
...
...     # Render the rectangle
...     cvui.rect(frame, rectangle.x, rectangle.y, rectangle.width, rectangle.height, 0xff0000)
...
...     # This function must be called *AFTER* all UI components. It does
...     # all the behind the scenes magic to handle mouse clicks, etc, then
...     # shows the frame in a window like cv2.imshow() does.
...     cvui.imshow(WINDOW_NAME, frame)
...
...     # Check if ESC key was pressed
...     if cv2.waitKey(20) == cvui.ESCAPE:
...             break
>>> cv2.destroyWindow(WINDOW_NAME)
Display a button whose graphics are images (np.ndarray). The button accepts three images to describe its states, which are idle (no mouse interaction), over (mouse is over the button) and down (mouse clicked the button). The button size will be defined by the width and height of the images.
- Parameters
where (np.ndarray) – image/frame where the component should be rendered.
x (int) – Position X where the component should be placed.
y (int) – Position Y where the component should be placed.
width (int) – Width of the button.
height (int) – Height of the button.
label (str) – Text displayed inside the button.
idle (np.ndarray) – An image that will be rendered when the button is not interacting with the mouse cursor.
over (np.ndarray) – An image that will be rendered when the mouse cursor is over the button.
down (np.ndarray) – An image that will be rendered when the mouse cursor clicked the button (or is clicking).
- Returns
flag (bool) :
Trueeverytime the user clicks the button.
Examples
>>> #=== If you use "width", "height", "label" ===
>>> import cv2
>>> import numpy as np
>>> from pycharmers.opencv import cvui
...
>>> WINDOW_NAME = 'Button shortcut'
>>> frame = np.zeros((150, 650, 3), np.uint8)
>>> # Init cvui and tell it to use a value of 20 for cv2.waitKey()
>>> # because we want to enable keyboard shortcut for
>>> # all components, e.g. button with label "&Quit".
>>> # If cvui has a value for waitKey, it will call
>>> # waitKey() automatically for us within cvui.update().
>>> cvui.init(windowNames=WINDOW_NAME, delayWaitKey=20);
>>> while (True):
...     # Fill the frame with a nice color
...     frame[:] = (49, 52, 49)
...
...     cvui.text(where=frame, x=40, y=40, text='To exit this app click the button below or press Q (shortcut for the button below).')
...
...     # Exit the application if the quit button was pressed.
...     # It can be pressed because of a mouse click or because
...     # the user pressed the "q" key on the keyboard, which is
...     # marked as a shortcut in the button label ("&Quit").
...     if cvui.button(where=frame, x=300, y=80, label="&Quit"):
...             break
...
...     # Since cvui.init() received a param regarding waitKey,
...     # there is no need to call cv.waitKey() anymore. cvui.update()
...     # will do it automatically.
...     cvui.update()
...     cv2.imshow(WINDOW_NAME, frame)
>>> cv2.destroyWindow(WINDOW_NAME)
...
>>> #=== If you use "idle", "over", "down" ===
>>> import cv2
>>> import numpy as np
>>> from pycharmers.opencv import cvui, SAMPLE_LENA_IMG, cv2read_mpl
...
>>> WINDOW_NAME = 'Image button'
>>> frame = np.zeros(shape=(600, 512, 3), dtype=np.uint8)
>>> idle = cv2.imread(SAMPLE_LENA_IMG)
>>> down = np.repeat(cv2.imread(SAMPLE_LENA_IMG, cv2.IMREAD_GRAYSCALE).reshape(*idle.shape[:2], 1), repeats=3, axis=2)
>>> over = cv2read_mpl(SAMPLE_LENA_IMG)
>>> cvui.init(WINDOW_NAME)
...
>>> while (True):
...     # Fill the frame with a nice color
...     frame[:] = (49, 52, 49)
...
...     # Render an image-based button. You can provide images
...     # to be used to render the button when the mouse cursor is
...     # outside, over or down the button area.
...     if cvui.button(frame, 0, 80, idle=idle, over=over, down=down):
...             print('Image button clicked!')
...
...     cvui.text(frame, 150, 30, 'This image behaves as a button')
...
...     # Render a regular button.
...     if cvui.button(frame, 0, 80, 'Button'):
...             print('Regular button clicked!')
...
...     # This function must be called *AFTER* all UI components. It does
...     # all the behind the scenes magic to handle mouse clicks, etc.
...     cvui.update()
...
...     # Show everything on the screen
...     cv2.imshow(WINDOW_NAME, frame)
...
...     # Check if ESC key was pressed
...     if cv2.waitKey(20) == cvui.ESCAPE:
...             break
>>> cv2.destroyWindow(WINDOW_NAME)
-
pycharmers.opencv.cvui.image(where=None, x=0, y=0, image=None)[source]¶ Display an image (np.ndarray).
- Parameters
where (np.ndarray) – image/frame where the component should be rendered.
x (int) – Position X where the component should be placed.
y (int) – Position Y where the component should be placed.
image (np.ndarray) – Image to be rendered in the specified destination.
Examples
>>> import cv2
>>> import numpy as np
>>> from pycharmers.opencv import cvui, SAMPLE_LENA_IMG
...
>>> WINDOW_NAME = 'Image'
>>> frame = np.zeros(shape=(1200, 512, 3), dtype=np.uint8)
>>> img = cv2.imread(SAMPLE_LENA_IMG)
>>> cvui.init(WINDOW_NAME)
...
>>> while (True):
...     # Fill the frame with a nice color
...     frame[:] = (49, 52, 49)
...
...     cvui.beginRow(frame, x=0, y=50)
...     cvui.image(image=img)
...     cvui.endRow()
...
...     cvui.beginRow(frame, x=0, y=650)
...     cvui.image(image=img)
...     cvui.endRow()
...
...     cvui.update()
...
...     cv2.imshow(WINDOW_NAME, frame)
...     if cv2.waitKey(20) == cvui.ESCAPE:
...             break
>>> cv2.destroyWindow(WINDOW_NAME)
-
pycharmers.opencv.cvui.trackbar(where=None, x=0, y=0, width=50, value=[], min=0.0, max=25.0, segments=1, labelfmt='%.1Lf', options=0, discreteStep=1)[source]¶ Display a trackbar for numeric values that the user can increase/decrease by clicking and/or dragging the marker right or left. This component can use different types of data as its value, so it is imperative provide the right label format, e.g. ‘%d’ for ints, otherwise you might end up with weird errors.
- Parameters
where (np.ndarray) – image/frame where the component should be rendered.
x (int) – Position X where the component should be placed.
y (int) – Position Y where the component should be placed.
width (int) – Width of the trackbar.
value ([number]) – Array or list of numbers whose first position, i.e.
value[0], will be used to store the current value of the trackbar. It will be modified when the user interacts with the trackbar. Any numeric type can be used, e.g. int, float, long double, etc.min (number) – Minimum value allowed for the trackbar.
max (number) – Maximum value allowed for the trackbar.
segments (int) – Number of segments the trackbar will have (default is 1). Segments can be seen as groups of numbers in the scale of the trackbar. For example, 1 segment means a single groups of values (no extra labels along the scale), 2 segments mean the trackbar values will be divided in two groups and a label will be placed at the middle of the scale.
labelfmt (str) – Formating string that will be used to render the labels. If you are using a trackbar with integers values, for instance, you can use
%dto render labels.options (uint) – Options to customize the behavior/appearance of the trackbar, expressed as a bitset. Available options are defined as
cvui.TRACKBAR_constants and they can be combined using the bitwise|operand. Available options arecvui.TRACKBAR_HIDE_SEGMENT_LABELS(do not render segment labels, but do render min/max labels),cvui.TRACKBAR_HIDE_STEP_SCALE(do not render the small lines indicating values in the scale),cvui.TRACKBAR_DISCRETE(changes of the trackbar value are multiples of theDiscreteStep param),cvui.TRACKBAR_HIDE_MIN_MAX_LABELS(do not render min/max labels),cvui.TRACKBAR_HIDE_VALUE_LABEL(do not render the current value of the trackbar below the moving marker), andcvui.TRACKBAR_HIDE_LABELS(do not render labels at all).discreteStep (number) – Amount that the trackbar marker will increase/decrease when the marker is dragged right/left (if option
cvui.TRACKBAR_DISCRETEis ON)
- Returns
The current value.
- Return type
float
Examples
>>> import cv2
>>> import numpy as np
>>> from pycharmers.opencv import cvui
...
>>> WINDOW_NAME = 'Trackbar'
>>> intValue = [30]
>>> ucharValue = [30]
>>> charValue = [30]
>>> floatValue = [12.]
>>> doubleValue = [45.]
>>> doubleValue2 = [15.]
>>> doubleValue3 = [10.3]
>>> frame = np.zeros((770, 350, 3), np.uint8)
>>> width = 300
>>> x = 10
>>> cvui.init(WINDOW_NAME)
...
>>> while (True):
...     # Fill the frame with a nice color
...     frame[:] = (49, 52, 49)
...
...     # The trackbar component uses templates to guess the type of its arguments.
...     # You have to be very explicit about the type of the value, the min and
...     # the max params. For instance, if they are double, use 100.0 instead of 100.
...     cvui.text(frame, x, 10, 'double, step 1.0 (default)')
...     cvui.trackbar(frame, x, 40, width, doubleValue, 0., 100.)
...
...     cvui.text(frame, x, 120, 'float, step 1.0 (default)')
...     cvui.trackbar(frame, x, 150, width, floatValue, 10., 15.)
...
...     # You can specify segments and custom labels. Segments are visual marks in
...     # the trackbar scale. Internally the value for the trackbar is stored as
...     # long double, so the custom labels must always format long double numbers, no
...     # matter the type of the numbers being used for the trackbar. E.g. %.2Lf
...     cvui.text(frame, x, 230, 'double, 4 segments, custom label %.2Lf')
...     cvui.trackbar(frame, x, 260, width, doubleValue2, 0., 20., 4, '%.2Lf')
...
...     # Again: you have to be very explicit about the value, the min and the max params.
...     # Below is a uchar trackbar. Observe the uchar cast for the min, the max and
...     # the step parameters.
...     cvui.text(frame, x, 340, 'uchar, custom label %.0Lf')
...     cvui.trackbar(frame, x, 370, width, ucharValue, 0, 255, 0, '%.0Lf')
...
...     # You can change the behavior of any tracker by using the options parameter.
...     # Options are defined as a bitfield, so you can combine them.
...     # E.g.
...     # TRACKBAR_DISCRETE                                                     # value changes are discrete
...     # TRACKBAR_DISCRETE | TRACKBAR_HIDE_LABELS      # discrete changes and no labels
...     cvui.text(frame, x, 450, 'double, step 0.1, option TRACKBAR_DISCRETE')
...     cvui.trackbar(frame, x, 480, width, doubleValue3, 10., 10.5, 1, '%.1Lf', cvui.TRACKBAR_DISCRETE, 0.1)
...
...     # More customizations using options.
...     options = cvui.TRACKBAR_DISCRETE | cvui.TRACKBAR_HIDE_SEGMENT_LABELS
...     cvui.text(frame, x, 560, 'int, 3 segments, DISCRETE | HIDE_SEGMENT_LABELS')
...     cvui.trackbar(frame, x, 590, width, intValue, 10, 50, 3, '%.0Lf', options, 2)
...
...     # Trackbar using char type.
...     cvui.text(frame, x, 670, 'char, 2 segments, custom label %.0Lf')
...     cvui.trackbar(frame, x, 700, width, charValue, -128, 127, 2, '%.0Lf')
...
...     # This function must be called *AFTER* all UI components. It does
...     # all the behind the scenes magic to handle mouse clicks, etc.
...     cvui.update()
...
...     # Show everything on the screen
...     cv2.imshow(WINDOW_NAME, frame)
...
...     # Check if ESC key was pressed
...     if cv2.waitKey(20) == cvui.ESCAPE:
...             break
>>> cv2.destroyWindow(WINDOW_NAME)
-
pycharmers.opencv.cvui.window(where=None, x=0, y=0, width=640, height=480, title='')[source]¶ Display a window (a block with a title and a body).
- Parameters
where (np.ndarray) – image/frame where the component should be rendered.
x (int) – Position X where the component should be placed.
y (int) – Position Y where the component should be placed.
width (int) – Width of the window.
height (int) – Height of the window.
title (str) – Text displayed as the title of the window.
Examples
>>> import cv2
>>> import numpy as np
>>> from pycharmers.opencv import cvui
...
>>> WINDOW_NAME = 'Matryoshka'
>>> frame = np.zeros(shape=(150, 150, 3), dtype=np.uint8)
>>> cvui.init(WINDOW_NAME)
...
>>> while (True):
...     frame[:] = (49, 52, 49)
...
...     cvui.beginRow(frame, 10, 10, 100, 100)
...     cvui.text(frame, 0, 5, text="This is Matryoshka.")
...     for i in range(1,5):
...             cvui.window(frame, i*20, i*20, 80-i*20, 80-i*20, f"window{i:>02}")
...     cvui.endRow()
...
...     cvui.update()
...     cv2.imshow(WINDOW_NAME, frame)
...     if cv2.waitKey(20) == cvui.ESCAPE:
...             break
>>> cv2.destroyWindow(WINDOW_NAME)
-
pycharmers.opencv.cvui.rect(where=None, x=0, y=0, width=160, height=120, borderColor=16711680, fillingColor=4278190080)[source]¶ Display a filled rectangle.
- Parameters
where (np.ndarray) – image/frame where the component should be rendered.
x (int) – Position X where the component should be placed.
y (int) – Position Y where the component should be placed.
width (int) – Width of the rectangle.
height (int) – Height of the rectangle.
borderColor (uint) – Color of rectangle’s border in the format
0xRRGGBB, e.g.0xff0000for red.fillingColor (uint) – Color of rectangle’s filling in the format 0xAARRGGBB, e.g. 0x00ff0000 for red, 0xff000000 for transparent filling.
Examples
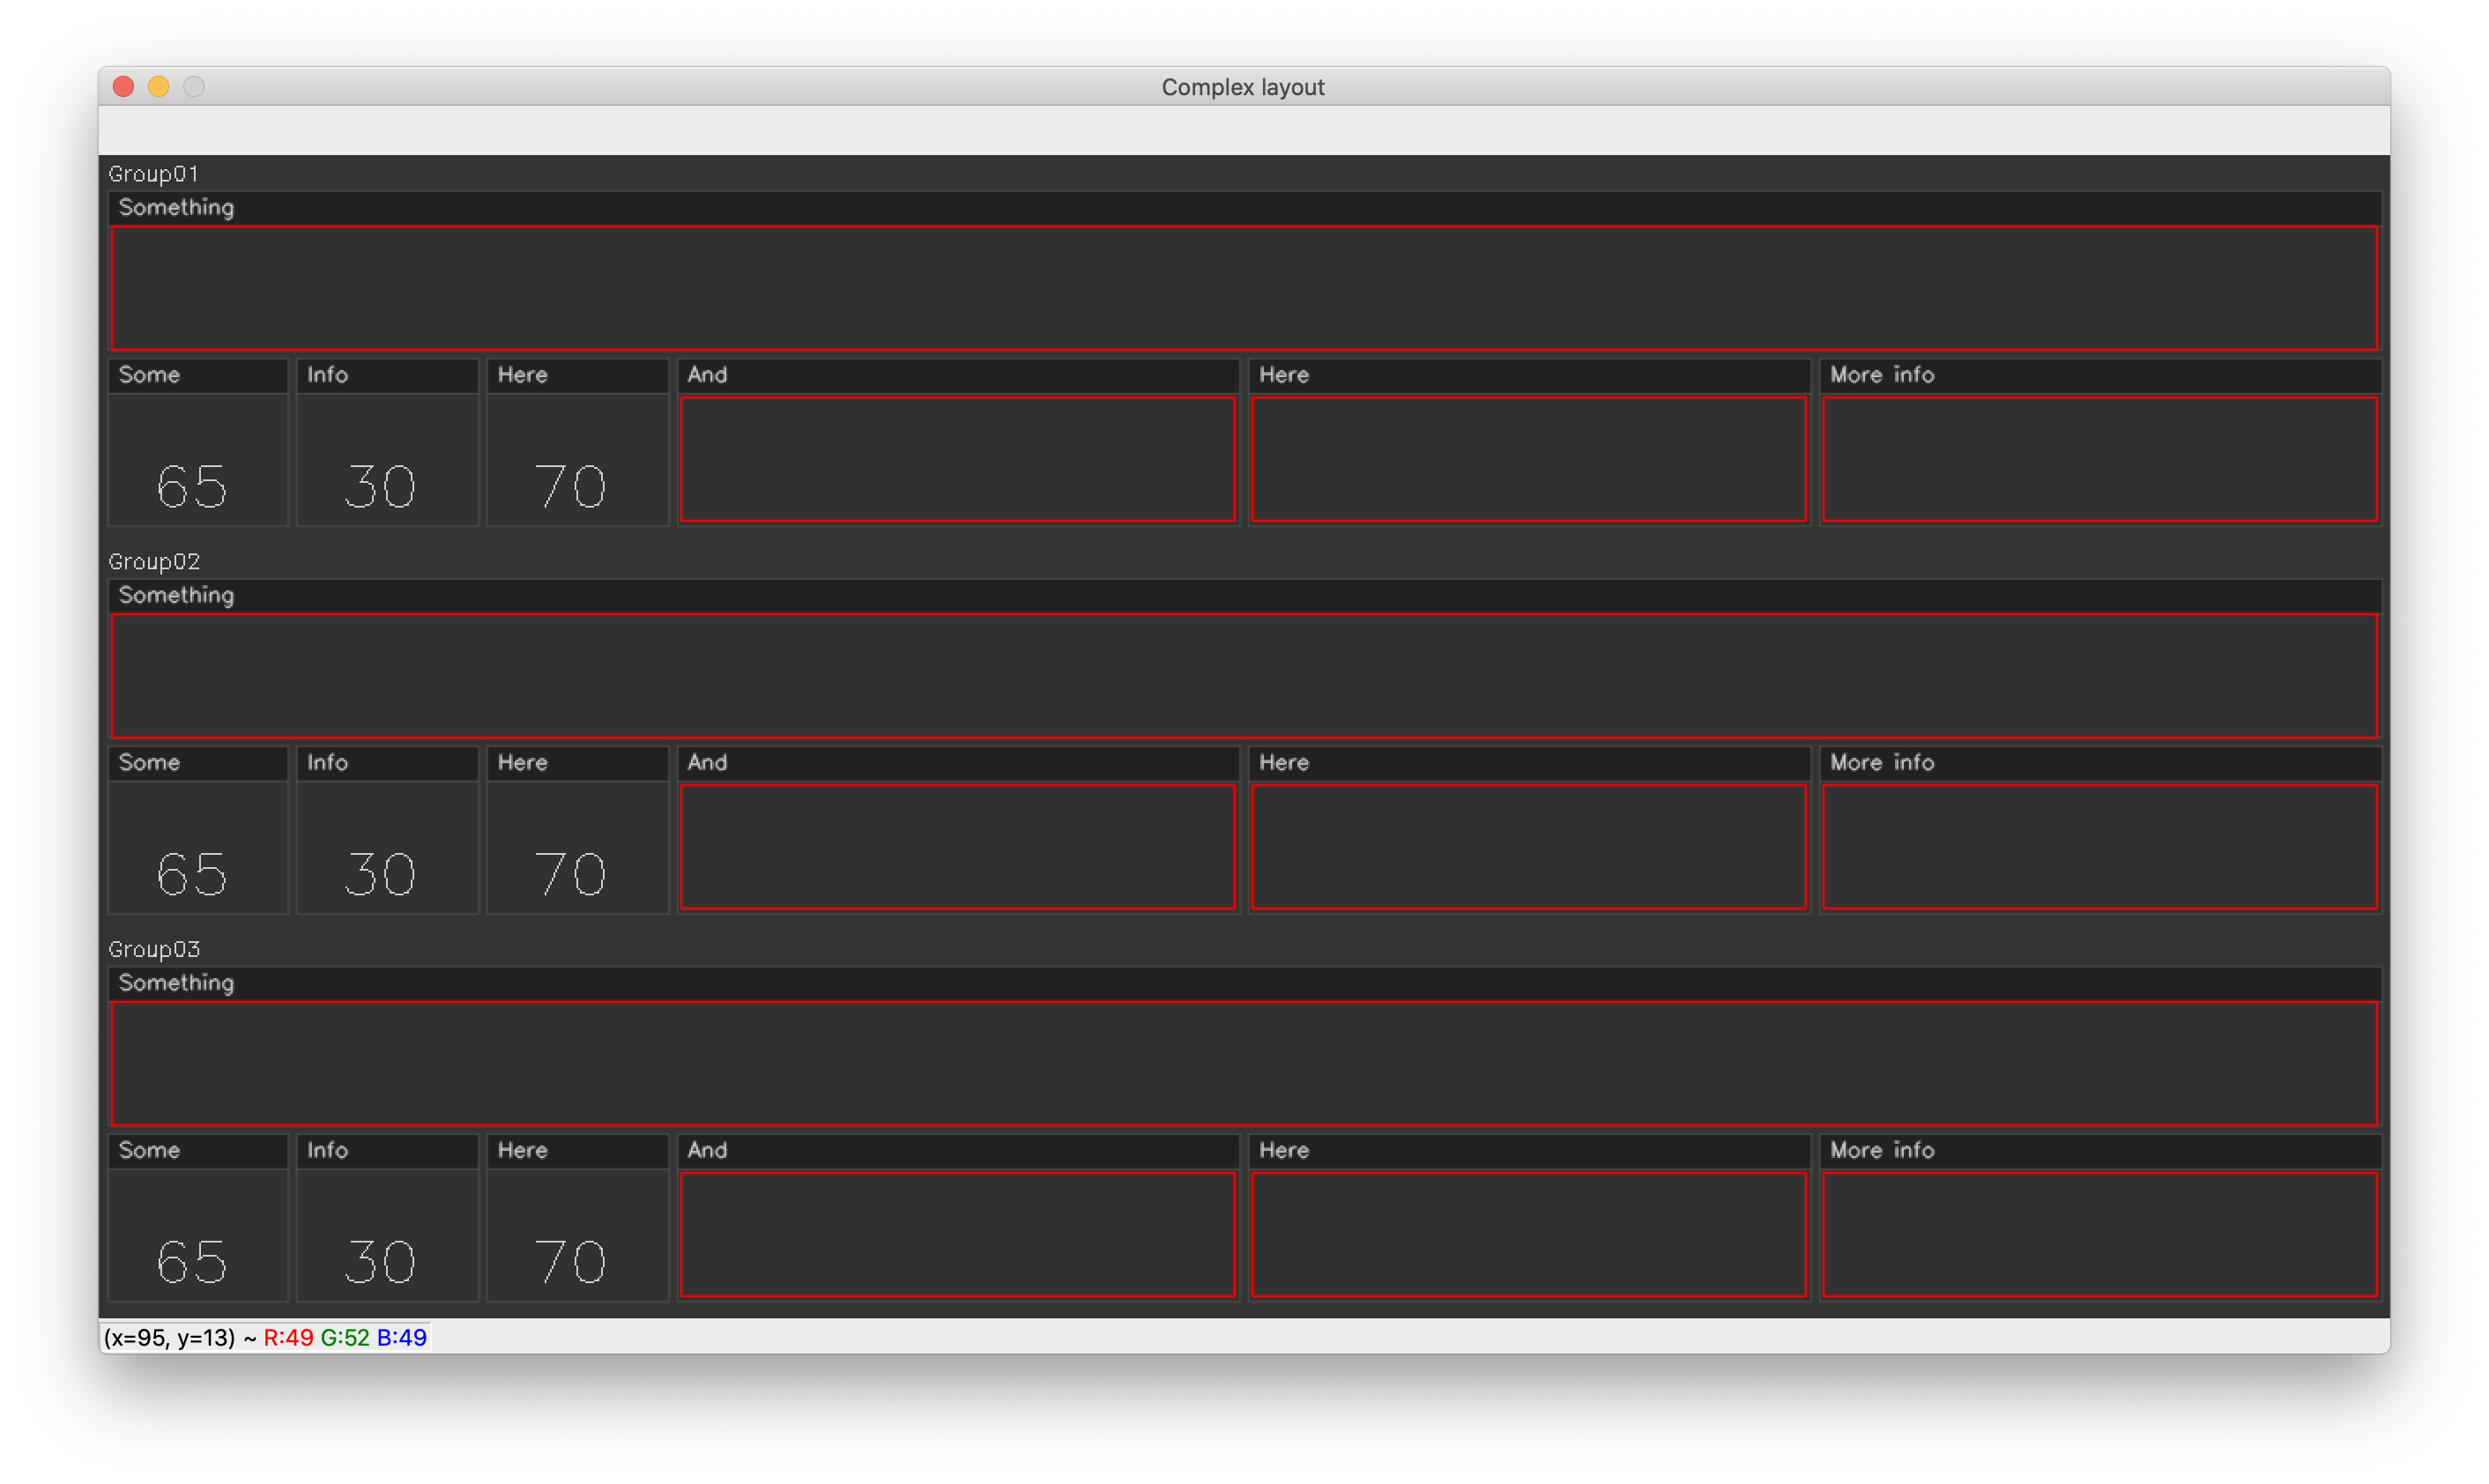
>>> import cv2
>>> import numpy as np
>>> from pycharmers.opencv import cvui
...
>>> def group(frame, x, y, width, height, group_title):
...     padding = 5
...     w = (width - padding) / 4
...     h = (height - 15 - padding) / 2
...     pos = cvui.Point(x + padding, y + 5)
...
...     cvui.text(frame, pos.x, pos.y, text=group_title)
...     pos.y += 15
...
...     cvui.window(frame, pos.x, pos.y, width - padding * 2, h - padding, "Something")
...     cvui.rect(frame, pos.x + 2, pos.y + 20, width - padding * 2 - 5, h - padding - 20, 0xff0000)
...     pos.y += h
...
...     cvui.window(frame, pos.x, pos.y, w / 3 - padding, h, "Some")
...     cvui.text(frame, pos.x + 25, pos.y + 60, text="65", fontScale=1.1)
...     pos.x += w / 3
...
...     cvui.window(frame, pos.x, pos.y, w / 3 - padding, h, "Info")
...     cvui.text(frame, pos.x + 25, pos.y + 60, text="30", fontScale=1.1)
...     pos.x += w / 3
...
...     cvui.window(frame, pos.x, pos.y, w / 3 - padding, h, "Here")
...     cvui.text(frame, pos.x + 25, pos.y + 60, text="70", fontScale=1.1)
...     pos.x += w / 3
...
...     cvui.window(frame, pos.x, pos.y, w - padding, h, "And")
...     cvui.rect(frame, pos.x + 2, pos.y + 22, w - padding - 5, h - padding - 20, 0xff0000)
...     pos.x += w
...
...     cvui.window(frame, pos.x, pos.y, w - padding, h, "Here")
...     cvui.rect(frame, pos.x + 2, pos.y + 22, w - padding - 5, h - padding - 20, 0xff0000)
...     pos.x += w
...
...     cvui.window(frame, pos.x, pos.y, w - padding, h, "More info")
...     cvui.rect(frame, pos.x + 2, pos.y + 22, w - padding - 5, h - padding - 20, 0xff0000)
...     pos.x += w
...
... height = 220
... spacing = 10
... num_groups = 3
... frame = np.zeros((height*num_groups, 1300, 3), np.uint8)
...
... WINDOW_NAME = "Complex layout"
... cvui.init(WINDOW_NAME)
...
... while (True):
...     # Fill the frame with a nice color
...     frame[:] = (49, 52, 49)
...
...     rows, cols, channels = frame.shape
...
...     # Render three groups of components.
...     y = 0
...     for i in range(num_groups):
...             group(frame, 0, y, cols, height-spacing, f"Group{i+1:>02}")
...             y += height
...
...     # This function must be called *AFTER* all UI components. It does
...     # all the behind the scenes magic to handle mouse clicks, etc.
...     cvui.update()
...
...     # Show everything on the screen
...     cv2.imshow(WINDOW_NAME, frame)
...
...     # Check if ESC key was pressed
...     if cv2.waitKey(20) == 27:
...             break
>>> cv2.destroyWindow(WINDOW_NAME)
Output
-
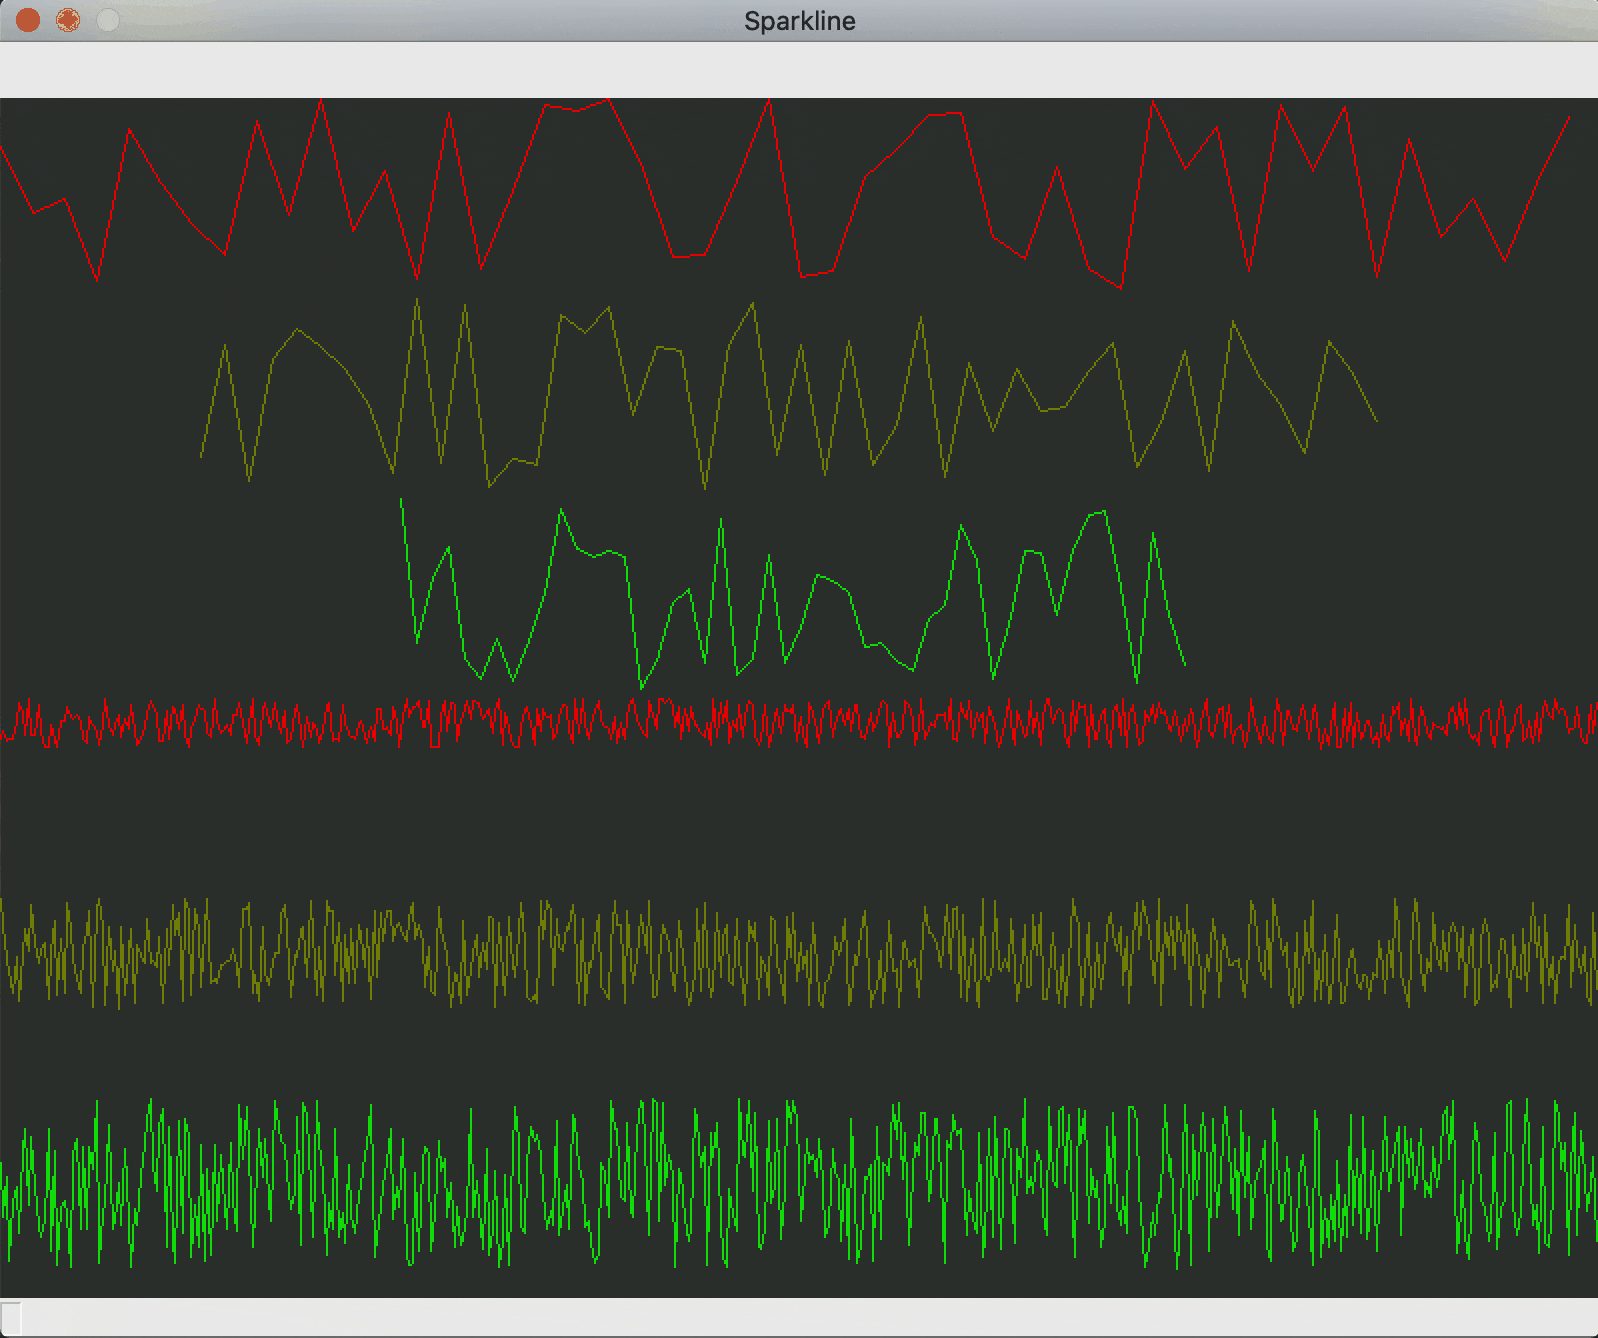
pycharmers.opencv.cvui.sparkline(where=None, x=0, y=0, values=[], width=160, height=120, color=65280)[source]¶ Display the values of a vector as a sparkline.
- Parameters
where (np.ndarray) – image/frame where the component should be rendered.
x (int) – Position X where the component should be placed.
y (int) – Position Y where the component should be placed.
values ([number]) – Array or List containing the numeric values to be used in the sparkline.
width (int) – Width of the rectangle.
height (int) – Height of the rectangle.
color (uint) – Color of sparkline in the format
0xRRGGBB, e.g.0xff0000for red.
Examples
>>> import cv2
>>> import numpy as np
>>> from pycharmers.opencv import cvui
...
>>> WINDOW_NAME = 'Sparkline'
>>> frame = np.zeros((600, 800, 3), np.uint8)
>>> cvui.init(WINDOW_NAME)
>>> rnd = np.random.RandomState()
...
>>> while (True):
...     # Fill the frame with a nice color
...     frame[:] = (49, 52, 49)
...
...     for i,points in enumerate(rnd.uniform(low=0., high=300., size=(3,50))):
...             cvui.sparkline(frame, 100*i, 100*i, points, 800-200*i, 100, 0xff0000 >> i);
...     for j,points in enumerate(rnd.uniform(low=0., high=300., size=(3,500))):
...             cvui.sparkline(frame, 0, 100*(i+j+1), points, 800, 30+30*j, 0xff0000 >> j);
...
...     # This function must be called *AFTER* all UI components. It does
...     # all the behind the scenes magic to handle mouse clicks, etc.
...     cvui.update()
...
...     # Show everything on the screen
...     cv2.imshow(WINDOW_NAME, frame)
...
...     # Check if ESC key was pressed
...     if cv2.waitKey(20) == cvui.ESCAPE:
...             break
>>> cv2.destroyWindow(WINDOW_NAME)
Output
-
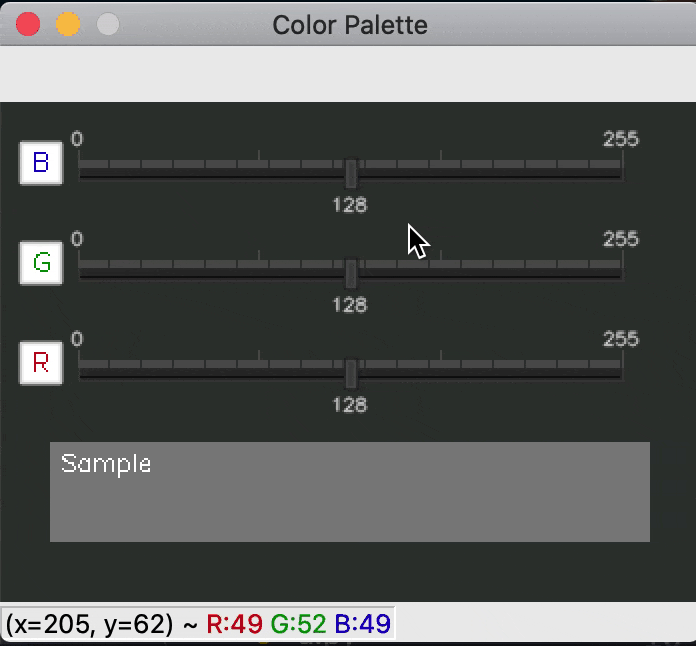
pycharmers.opencv.cvui.colorpalette(where=None, x=0, y=0, bgr=[], width=300, height=50)[source]¶ Display a color palette using
trackbar.- Parameters
where (np.ndarray) – image/frame where the component should be rendered.
x (int) – Position X where the component should be placed.
y (int) – Position Y where the component should be placed.
bgr (list) – Array or list of BGR color.
width (int) – Width of the each trackbar and the example image.
height (int) – Height of the example image.
- Returns
The current BGR value.
- Return type
tuple
Examples
>>> import cv2
>>> import numpy as np
>>> from pycharmers.opencv import cvui
...
>>> WINDOW_NAME = 'Color Palette'
>>> frame = np.zeros((250, 350, 3), np.uint8)
>>> bgr = [128, 128, 128]
>>> cvui.init(WINDOW_NAME)
...
>>> while (True):
...     # Fill the frame with a nice color
...     frame[:] = (49, 52, 49)
...     # More customizations using options.
...     bgr = cvui.colorpalette(where=frame, x=10, y=10, bgr=bgr, width=300, height=50)
...     cvui.update()
...     # Show everything on the screen
...     cv2.imshow(WINDOW_NAME, frame)
...     # Check if ESC key was pressed
...     if cv2.waitKey(20) == cvui.ESCAPE:
...             break
>>> cv2.destroyWindow(WINDOW_NAME)
Output
-
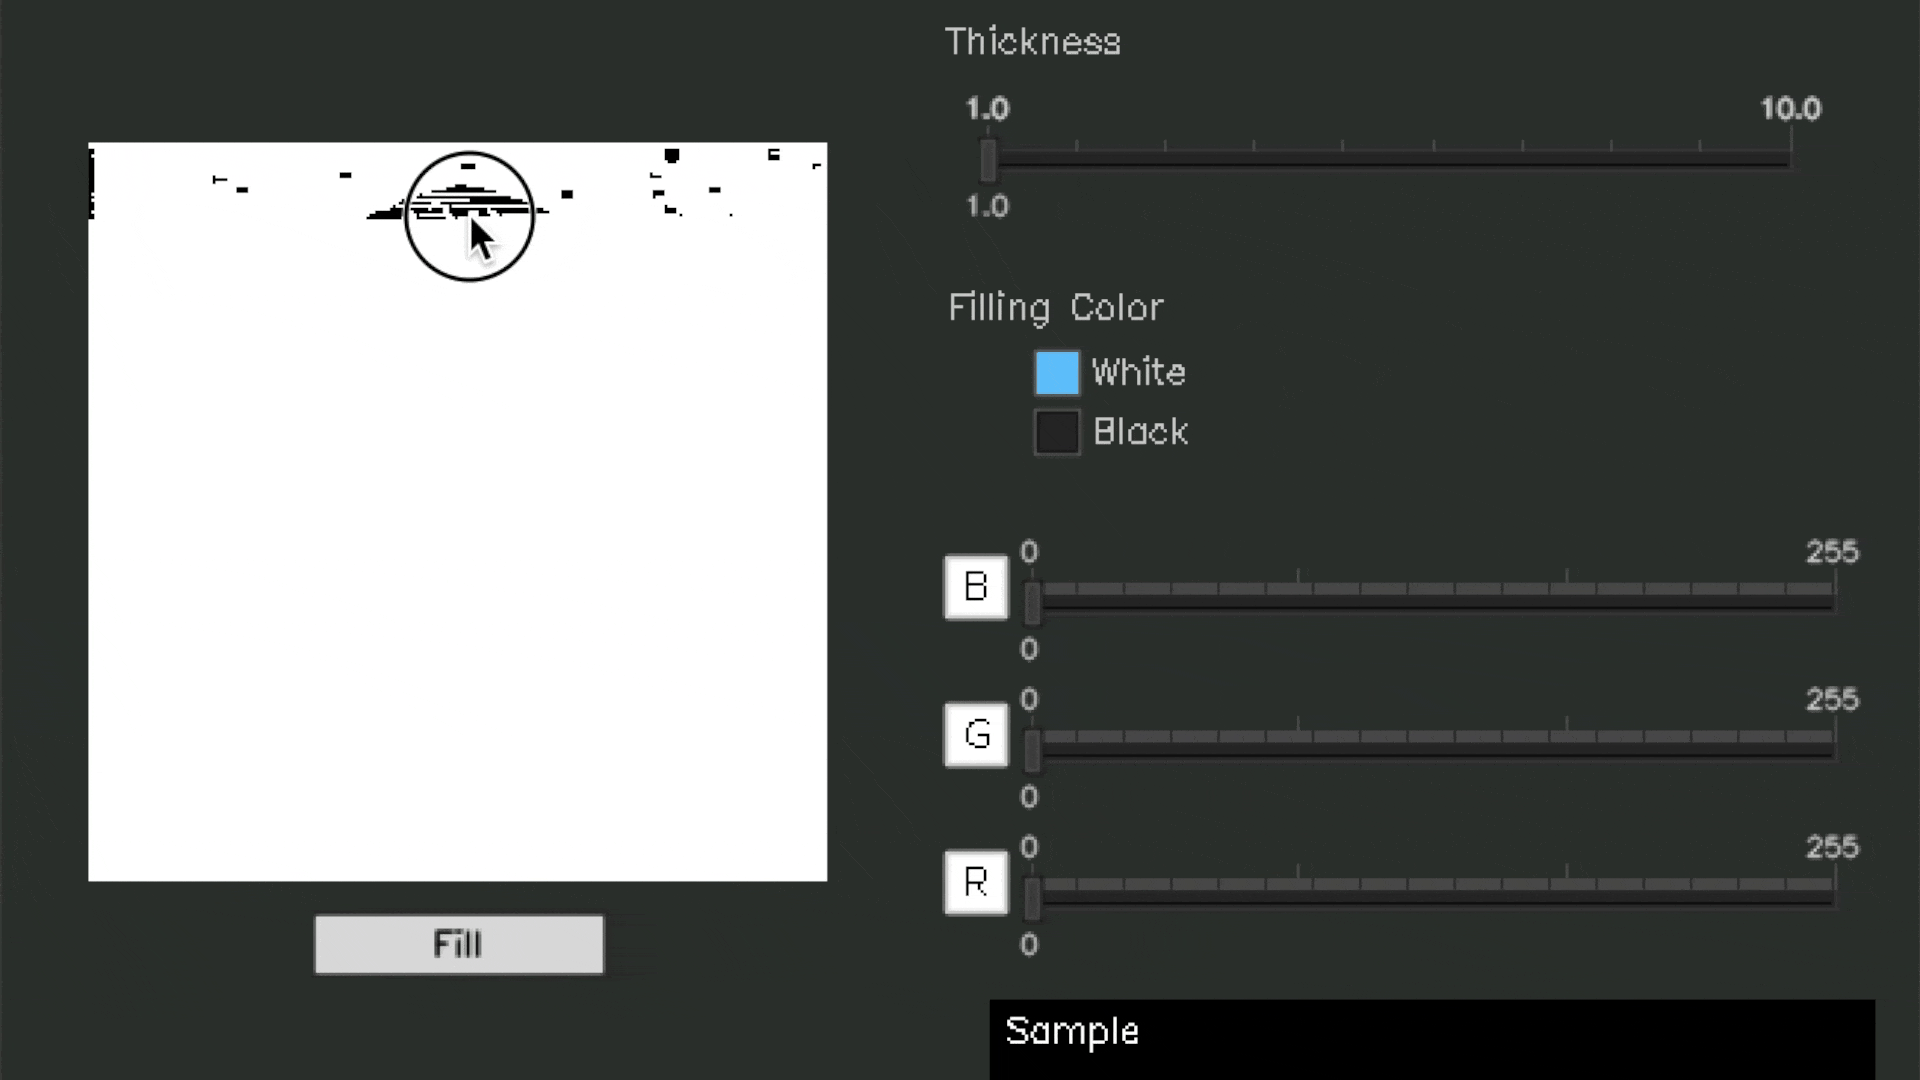
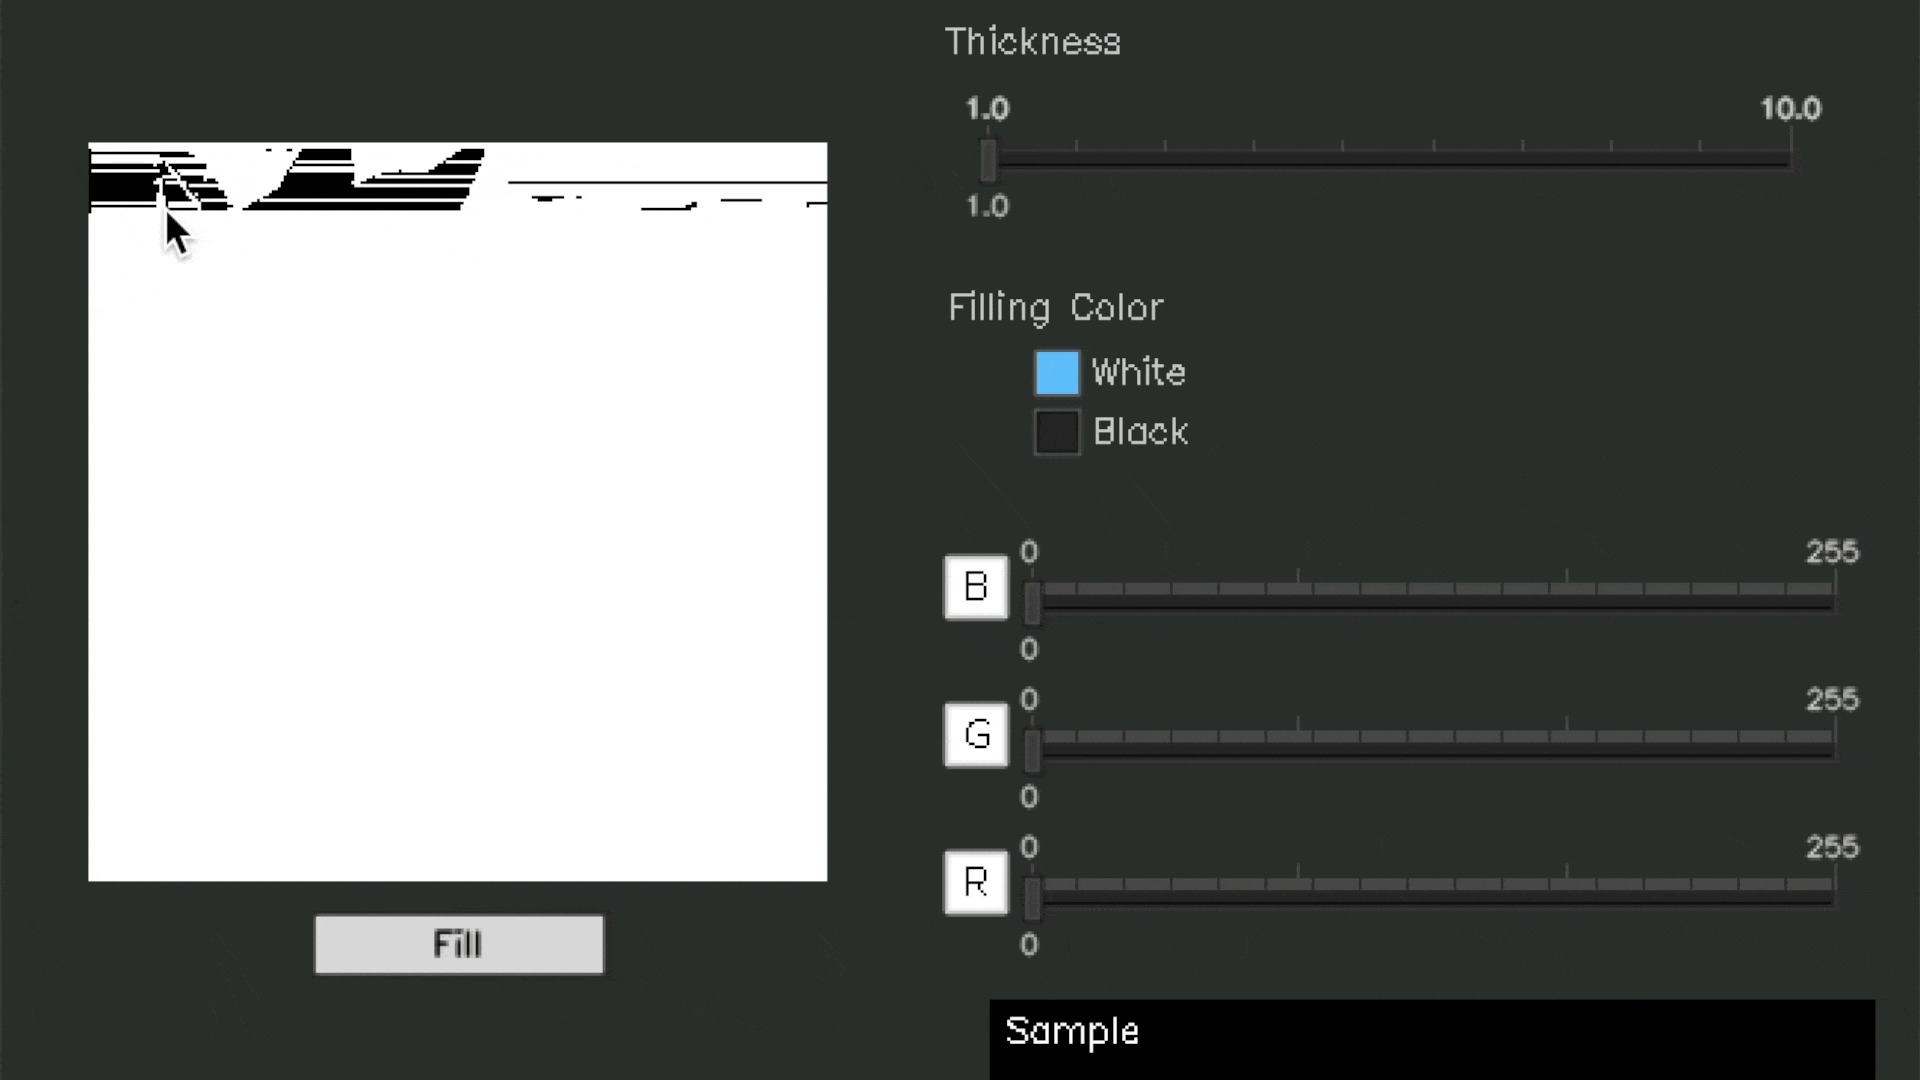
pycharmers.opencv.cvui.drawingpad(where=None, x=0, y=0, image=None, color=16777215, fillingColor=0, thickness=3)[source]¶ Create a drawing pad.
- Parameters
where (np.ndarray) – image/frame where the component should be rendered.
x (int) – Position X where the component should be placed.
y (int) – Position Y where the component should be placed.
image (np.ndarray) – Image to be rendered in the specified destination.
color (uint) – Color of the line in the format
0xRRGGBB, e.g.0xff0000for red.fillingColor (uint) – Color of filling in the format 0xAARRGGBB, e.g. 0x00ff0000 for red, 0xff000000 for transparent filling.
thickness (int) – Thickness of the lines used to draw a line.
- Returns
The current
image.- Return type
np.ndarray
Examples
>>> import cv2
>>> import numpy as np
>>> from pycharmers.opencv import cvui
...
>>> WINDOW_NAME = 'Drawing Pad'
>>> frame = np.zeros(shape=(400, 650, 3), dtype=np.uint8)
>>> image = np.full(shape=(250,250,3), fill_value=255, dtype=np.uint8)
>>> bgr = [128, 128, 128]
>>> fillingColors = ["White", "Black"]
>>> fillingStates = [True, False]
>>> thickness = [3]
>>> cvui.init(WINDOW_NAME)
>>> cv2.moveWindow(winname=WINDOW_NAME, x=0, y=0)
...
>>> while (True):
...     # Fill the frame with a nice color
...     frame[:] = (49, 52, 49)
...     cvui.text(where=frame, x=320, y=10,  text="Thickness")
...     cvui.text(where=frame, x=320, y=100, text="Filling Color")
...     thick = cvui.trackbar(where=frame,   x=320, y=30, width=300, value=thickness, min=1, max=10, options=cvui.TRACKBAR_DISCRETE, discreteStep=1)
...     idx = cvui.radiobox(where=frame,     x=350, y=120, labels=fillingColors, states=fillingStates)
...     bgr = cvui.colorpalette(where=frame, x=320, y=180, bgr=bgr, width=300, height=50)
...     image = cvui.drawingpad(where=frame, x=30,  y=50, image=image, color=bgr, fillingColor=[0xffffff, 0x000000][idx], thickness=thick)
...     cvui.update()
...     # Show everything on the screen
...     cv2.imshow(WINDOW_NAME, frame)
...     # Check if ESC key was pressed
...     if cv2.waitKey(20) == cvui.ESCAPE:
...                     break
>>> cv2.destroyWindow(WINDOW_NAME)
>>> # You can draw a picture as follows by executing the following program while running the above program.
>>> def drawing(path, dsize=(250,250), thresh=127, sleep=3, drawing_val=0, offset=(30,125)):
...     """
...     Args:
...         path (str)        : Path to binary image.
...         dsize (tuple)     : The size of drawing pad. ( ``width`` , ``height`` )
...         thresh (int)      : If you prepare the binary (bgr) image, you can use ``cv2.threshold`` to convert it to binary image. (See :meth:`cvPencilSketch <pycharmers.cli.cvPencilSketch.cvPencilSketch>` for more details.)
...         sleep (int)       : Delay execution for a given number of seconds. (You have to click the OpenCV window before before entering the for-loop.)
...         drawing_val (int) : At what value to draw.
...         offset (tuple)    : Offset from top left ( ``cv2.moveWindow(winname=WINDOW_NAME, x=0, y=0)`` ) to drawing pad.
...     """
...     import cv2
...     import time
...     import pyautogui as pgui # Use for controling the mouse. (https://pyautogui.readthedocs.io/en/latest/mouse.html)
...     img = cv2.resize(src=cv2.imread(path, 0), dsize=dsize)
...     img = cv2.threshold(src=img, thresh=thresh, maxval=255, type=cv2.THRESH_BINARY)[1]
...     WINDOW_NAME = "Apotheosis"
...     cv2.imshow(winname=v, mat=img)
...     width,height = dsize
...     x_offset, y_offset = offset
...     time.sleep(sleep)
...     for i in range(height):
...             pgui.moveTo(x_offset, y_offset+i)
...             prev_val, prev_pos = (0, 0)
...             for j in range(width+1):
...                     if j<width:
...                             val = img[i,j]
...                     else:
...                             val = -1 # Must be different from ``prev_val``
...                     if prev_val != val:
...                             # Drawing.
...                             if prev_val == drawing_val:
...                                     pgui.mouseDown()
...                                     pgui.dragRel(xOffset=j-prev_pos, yOffset=0, button="left", duration=0.0, mouseDownUp=True)
...                                     pgui.mouseUp()
...                             else:
...                                     pgui.moveRel(xOffset=j-prev_pos, yOffset=0, duration=0.0)
...                             prev_pos = j
...                             prev_val = val
...                     key = cv2.waitKey(1)
...                     if key == 27: break
...             if key == 27: break
...     cv2.destroyWindow(WINDOW_NAME)
Example
-
pycharmers.opencv.cvui.beginRow(where=None, x=0, y=0, width=- 1, height=- 1, padding=0, bgColor=None)[source]¶ Start a new row.
One of the most annoying tasks when building UI is to calculate where each component should be placed on the screen. cvui has a set of methods that abstract the process of positioning components, so you don’t have to think about assigning a
xandycoordinate. Instead you just add components and cvui will place them as you go.You use
beginRow()to start a group of elements. AfterbeginRow()has been called, all subsequent component calls don’t have to specify the frame where the component should be rendered nor its position. The position of the component will be automatically calculated by cvui based on the components within the group. All components are placed side by side, from left to rightNOTE: Don’t forget to call
endRow()to finish the row, otherwise cvui will throw an error.- Parameters
where (np.ndarray) – image/frame where the component should be rendered.
x (int) – Position X where the component should be placed.
y (int) – Position Y where the component should be placed.
width (int) – Width of the row. If a negative value is specified, the width of the row will be automatically calculated based on the content of the block.
height (int) – Height of the row. If a negative value is specified, the height of the row will be automatically calculated based on the content of the block.
padding (int) – Space, in pixels, among the components of the block.
bgColor (tuple) – Background Color.
Examples
>>> import cv2
>>> import numpy as np
>>> from pycharmers.opencv import cvui
...
>>> WINDOW_NAME = 'Nested columns'
>>> frame = np.zeros((600, 800, 3), np.uint8)
>>> cvui.init(WINDOW_NAME)
...
>>> while (True):
...     # Fill the frame with a nice color
...     frame[:] = (49, 52, 49)
...
...     # Define a row at position (10, 50) with width 100 and height 150.
...     cvui.beginRow(frame, 10, 50, width=100, height=150)
...     # The components below will be placed one beside the other.
...     cvui.text(text='Row starts')
...     cvui.button(label='btn')
...     cvui.text(text='This is the end of the row!')
...     cvui.endRow()
...
...     # Here is another nested row/column
...     cvui.beginRow(frame, 50, 300, 100, 150)
...     cvui.button(label='btn2')
...     cvui.text(text='This is second row.')
...     if cvui.button(label='&Quit'):
...             break
...     cvui.endRow()
...     cvui.update()
...     cv2.imshow(WINDOW_NAME, frame)
...     if cv2.waitKey(20) == cvui.ESCAPE:
...             break
>>> cv2.destroyWindow(WINDOW_NAME)
-
pycharmers.opencv.cvui.endRow()[source]¶ End a row. You must call this function only if you have previously called its counter part, the
beginRow()function.
-
pycharmers.opencv.cvui.beginColumn(where=None, x=0, y=0, width=- 1, height=- 1, padding=0, bgColor=None)[source]¶ Start a new column.
One of the most annoying tasks when building UI is to calculate where each component should be placed on the screen. cvui has a set of methods that abstract the process of positioning components, so you don’t have to think about assigning a X and Y coordinate. Instead you just add components and cvui will place them as you go.
You use
beginColumn()to start a group of elements. AfterbeginColumn()has been called, all subsequent component calls don’t have to specify the frame where the component should be rendered nor its position. The position of the component will be automatically calculated by cvui based on the components within the group. All components are placed below each other, from the top of the screen towards the bottom.- Parameters
where (np.ndarray) – image/frame where the component should be rendered.
x (int) – Position X where the component should be placed.
y (int) – Position Y where the component should be placed.
width (int) – Width of the column. If a negative value is specified, the width of the column will be automatically calculated based on the content of the block.
height (int) – Height of the column. If a negative value is specified, the height of the column will be automatically calculated based on the content of the block.
padding (int) – Space, in pixels, among the components of the block.
bgColor (tuple) – Background Color.
Examples
>>> import cv2
>>> import numpy as np
>>> from pycharmers.opencv import cvui
...
>>> WINDOW_NAME = 'Nested columns'
>>> frame = np.zeros((600, 800, 3), np.uint8)
>>> cvui.init(WINDOW_NAME)
...
>>> while (True):
...     # Fill the frame with a nice color
...     frame[:] = (49, 52, 49)
...
...     # Define a row at position (10, 50) with width 100 and height 150.
...     cvui.beginRow(frame, 10, 50, 100, 150)
...
...     cvui.beginColumn(width=100, height=150)
...     cvui.text(text='Column starts')
...     cvui.button(label='btn')
...     cvui.text(text='This is the end of the column!')
...     cvui.endColumn()
...
...     # Here is another nested row/column
...     cvui.beginColumn(width=100, height=150)
...     cvui.button(label='btn2')
...     cvui.text(text='This is second column.')
...     if cvui.button(label='&Quit'):
...             break
...     cvui.endColumn()
...
...     cvui.endRow()
...
...     cvui.update()
...     cv2.imshow(WINDOW_NAME, frame)
...
...     if cv2.waitKey(20) == cvui.ESCAPE:
...             break
>>> cv2.destroyWindow(WINDOW_NAME)
-
pycharmers.opencv.cvui.endColumn()[source]¶ End a column. You must call this function only if you have previously called its counter part, i.e.
beginColumn()
-
class
pycharmers.opencv.cvui.Point(x=0, y=0)[source]¶ Bases:
objectRepresent a 2D point.
-
x¶ Position X.
- Type
int
-
y¶ Position Y.
- Type
int
-
-
class
pycharmers.opencv.cvui.Rect(x=0, y=0, width=0, height=0)[source]¶ Bases:
objectRepresent a rectangle.
-
x¶ Position X.
- Type
int
-
y¶ Position Y.
- Type
int
-
width¶ Width.
- Type
int
-
height¶ Height.
- Type
int
-
-
class
pycharmers.opencv.cvui.Size(width=0, height=0)[source]¶ Bases:
pycharmers.opencv.cvui.RectRepresent the size of something, i.e. width and height.
It is essentially a simplified version of :py:class: Rect <pycharmers.opencv.cvui.Rect> where x and y are zero.
-
class
pycharmers.opencv.cvui.Block[source]¶ Bases:
objectDescribe a block structure used by cvui to handle
begin*()andend*()calls.-
where¶ Where the block should be rendered to.
- Type
np.ndarray
-
padding¶ Padding among components within this block.
- Type
int
-
type¶ Type of the block, e.g.
cvui.ROWorcvui.COLUMN.- Type
int
-
-
class
pycharmers.opencv.cvui.Label[source]¶ Bases:
objectDescribe a component label, including info about a shortcut.
If a label contains
"Re&start"-
hasShortcut¶ label[i]==&andi!=-1- Type
bool
-
shortcut¶ character after
"&"(label[i+1])- Type
str
-
textBeforeShortcut¶ Text before shortcut (
label[:i])- Type
str
-
textAfterShortcut¶ Text after shortcut (
label[i+1:])- Type
str
-
-
class
pycharmers.opencv.cvui.MouseButton[source]¶ Bases:
objectDescribe a mouse button
-
justReleased¶ Whether the mouse button was released, i.e. click event.
- Type
bool
-
justPressed¶ Whether the mouse button was just pressed, i.e. true for a frame when a button is down.
- Type
bool
-
pressed¶ Whether the mouse button is pressed or not.
- Type
bool
-
-
class
pycharmers.opencv.cvui.Mouse[source]¶ Bases:
objectDescribe the information of the mouse cursor
Status of each button. Use
cvui.{RIGHT,LEFT,MIDDLE}_BUTTONto access the buttons.- Type
dict
-
anyButton¶ Represent the behavior of all mouse buttons combined
- Type
-
class
pycharmers.opencv.cvui.Context[source]¶ Bases:
objectDescribe a (window) context.
-
windowName¶ Name of the window related to this context.
- Type
str
-
-
class
pycharmers.opencv.cvui.TrackbarParams(min=0.0, max=255.0, step=1.0, segments=0, labelfmt='%.0Lf', options=0)[source]¶ Bases:
objectDescribe the inner parts of the trackbar component.
-
min¶ Minimum value allowed for the trackbar.
- Type
number
-
max¶ Maximum value allowed for the trackbar.
- Type
number
-
step¶ Amount that should be increased/decreased when the user interacts with the counter buttons
- Type
number
-
segments¶ Number of segments the trackbar will have (default is 1). Segments can be seen as groups of numbers in the scale of the trackbar. For example, 1 segment means a single groups of values (no extra labels along the scale), 2 segments mean the trackbar values will be divided in two groups and a label will be placed at the middle of the scale.
- Type
int
-
labelfmt¶ Formating string that will be used to render the labels. If you are using a trackbar with integers values, for instance, you can use
%dto render labels.- Type
str
-
options¶ Options to customize the behavior/appearance of the trackbar, expressed as a bitset. Available options are defined as
cvui.TRACKBAR_constants and they can be combined using the bitwise|operand. Available options arecvui.TRACKBAR_HIDE_SEGMENT_LABELS(do not render segment labels, but do render min/max labels),cvui.TRACKBAR_HIDE_STEP_SCALE(do not render the small lines indicating values in the scale),cvui.TRACKBAR_DISCRETE(changes of the trackbar value are multiples of theDiscreteStep param),cvui.TRACKBAR_HIDE_MIN_MAX_LABELS(do not render min/max labels),cvui.TRACKBAR_HIDE_VALUE_LABEL(do not render the current value of the trackbar below the moving marker), andcvui.TRACKBAR_HIDE_LABELS(do not render labels at all).- Type
uint
-
-
class
pycharmers.opencv.cvui.Internal[source]¶ Bases:
objectThis class contains all stuff that cvui uses internally to render and control interaction with components.
-
defaultContext¶ Default window name.
- Type
str
-
currentContext¶ Current (active) window name.
- Type
str
-
contexts¶ Indexed by the window name.
- Type
dict
-
lastKeyPressed¶ Last key that was pressed. TODO: collect it per window
- Type
int
-
lastMousePosition¶ Last mouse position when that was pressed. TODO: collect it per window
- Type
-
delayWaitKey¶ Delay value (milliseconds) passed to
cv2.waitKey(). If a negative value is informed (default is-1), cvui will not automatically callcv2.waitKey()withincvui.update(), which will disable keyboard shortcuts for all components. If you want to enable keyboard shortcut for components (e.g. using & in a button label), you must specify a positive value for this param.- Type
int
-
stack¶ Block stack.
- Type
list
-
trackbarMarginX¶ X-axis Margin of trackbar.
- Type
int
-
isMouseButton(button, query)[source]¶ Get to know the relationship between the mouse and the
buttonby returning thebuttonstate according to thequery
-
mouseW(windowName='')[source]¶ Return the last position of the mouse.
- Parameters
windowName (str) – Name of the window whose mouse cursor will be used. If nothing is informed (default), the function will return the position of the mouse cursor for the default window (the one informed in
cvui.init()).- Returns
A point containing the position of the mouse cursor in the speficied window.
- Return type
point (Point)
-
mouseQ(query)[source]¶ Query the mouse for events, e.g. “is any button down now?”. Available queries are:
cvui.DOWN: any mouse button was pressed.cvui.mousereturnsTruefor a single frame only.cvui.UP: any mouse button was released.cvui.mousereturnsTruefor a single frame only.cvui.CLICK: any mouse button was clicked (went down then up, no matter the amount of frames in between).cvui.mousereturnsTruefor a single frame only.cvui.IS_DOWN: any mouse button is currently pressed.cvui.mousereturnsTruefor as long as the button is down/pressed.
It is easier to think of this function as the answer to a questions. For instance, asking if any mouse button went down:
>>> if (cvui.mouse(cvui.DOWN)):
...     # Any mouse button just went down.
The window whose mouse will be queried depends on the context. If
cvui.mouse(query)is being called aftercvui.context(), the window informed in the context will be queried. If no context is available, the default window (informed incvui.init()) will be used.- Parameters
query (int) – An integer describing the intended mouse query. Available queries are
cvui.DOWN,cvui.UP,cvui.CLICK, andcvui.IS_DOWN.- Returns
Whether the
buttonandqueryare match.- Return type
isMouseButton (bool)
-
mouseWQ(windowName, query)[source]¶ Query the mouse for events in a particular window. This function behave exactly like
cvui.mouse(query)with the difference that queries are targeted at a particular window.- Parameters
windowName (str) – Name of the window that will be queried.
query (int) – An integer describing the intended mouse query. Available queries are
cvui.DOWN,cvui.UP,cvui.CLICK, andcvui.IS_DOWN.
- Returns
Whether the
buttonandqueryare match.- Return type
isMouseButton (bool)
-
mouseBQ(button, query)[source]¶ Query the mouse for events in a particular button. This function behave exactly like
cvui.mouse(int query), with the difference that queries are targeted at a particular mouse button instead.- Parameters
button (int) – An integer describing the mouse button to be queried. Possible values are
cvui.LEFT_BUTTON,cvui.MIDDLE_BUTTONandcvui.LEFT_BUTTON.query (int) – An integer describing the intended mouse query. Available queries are
cvui.DOWN,cvui.UP,cvui.CLICK, andcvui.IS_DOWN.
- Returns
Whether the
buttonandqueryare match.- Return type
isMouseButton (bool)
-
mouseWBQ(windowName, button, query)[source]¶ Query the mouse for events in a particular button in a particular window. This function behave exactly like
cvui.mouse(int button, int query), with the difference that queries are targeted at a particular mouse button in a particular window instead.- Parameters
windowName (str) – Name of the window that will be queried.
button (int) – An integer describing the mouse button to be queried. Possible values are
cvui.LEFT_BUTTON,cvui.MIDDLE_BUTTONandcvui.LEFT_BUTTON.query (int) – An integer describing the intended mouse query. Available queries are
cvui.DOWN,cvui.UP,cvui.CLICK, andcvui.IS_DOWN.
- Returns
Whether the
buttonandqueryare match.- Return type
isMouseButton (bool)
-
init(windowName, delayWaitKey)[source]¶ Initiallize the window.
- Parameters
windowNames (str,list) – Array containing the name of the windows where components will be added. Those windows will be automatically if createNamedWindows is True.
delayWaitKey (int) – Delay value passed to
cv2.waitKey(). If a negative value is informed (default is-1), cvui will not automatically callcv2.waitKey()withincvui.update(), which will disable keyboard shortcuts for all components. If you want to enable keyboard shortcut for components (e.g. using & in a button label), you must specify a positive value for this param.
-
bitsetHas(bitset, value)[source]¶ Check whether
bitsethas the signal ofvaluee.g.cvui.TRACKBAR_HIDE_VALUE_LABEL- Parameters
bitset (int) – Binary value with various signals (=
1)value (int) – Binary value with only one
1
- Returns
Whether
bitsethas the signal ofvalueor not.- Return type
bool
-
error(errorId, message)[source]¶ Output the Error message.
- Parameters
errorId (int) – Error Id used in cvui.
message (str) – An additional message.
-
getContext(windowName='')[source]¶ Get Context.
- Parameters
windowName (str) – Name of the window whose UI interactions will be tracked.
-
property
isblockStackEmpty¶ Is block stack (
self.stack) is empty or not.
-
property
stackCount¶ The numeber of blocks in stack (
self.stack)
-
pushBlock(block)[source]¶ Push a
Blockobject intoself.stack- Parameters
block (Block) – A block structure.
-
createLabel(label)[source]¶ Create a Label object.
- Parameters
label (str) – Label string.
- Returns
Describe a component label, including info about a shortcut.
- Return type
-
text(block, x, y, text, fontFace=0, fontScale=0.4, color=13553358, thickness=1, lineType=8, updateLayout=True)[source]¶ Display a piece of text.
- Parameters
block (Block) – A block structure.
x (int) – Position X where the component should be placed.
y (int) – Position Y where the component should be placed.
text (str) – The text content.
fontFace (int) – Font type. (default=
cv2.FONT_HERSHEY_SIMPLEX)fontScale (float) – Font scale factor that is multiplied by the font-specific base size.
color (uint) – Color of the text in the format
0xRRGGBB, e.g.0xff0000for red.thickness (int) – Thickness of the lines used to draw a text.
lineType (int) – Line type. (default=
cv2.LINE_8)updateLayout (bool) – Whether updates layot or not.
-
counter(block, x, y, value, step, fmt)[source]¶ Display a counter for integer values that the user can increase/descrease by clicking the up and down arrows.
- Parameters
block (Block) – A block structure.
x (int) – Position X where the component should be placed.
y (int) – Position Y where the component should be placed.
value ([number]) – Array or List of numbers whose first position, i.e.
value[0], will be used to store the current value of the counter.step (number) – Amount that should be increased/decreased when the user interacts with the counter buttons
fmt (str) – How the value of the counter should be presented, as it was printed by
stdio's printf(). E.g.'%d'means the value will be displayed as an integer,'%0d'integer with one leading zero, etc.
- Returns
Number that corresponds to the current value of the counter.
- Return type
value (number)
-
clip(value, v_min=0.0, v_max=1.0)[source]¶ Given an interval, values outside the interval are clipped to the interval edges.
- Parameters
value (number) – value.
v_min (number) – Minimum value.
v_max (number) – Maximum value.
- Returns
Clipped value.
- Return type
number
-
trackbar(block, x, y, width, value, params)[source]¶ Display a trackbar for numeric values that the user can increase/decrease by clicking and/or dragging the marker right or left. This component can use different types of data as its value, so it is imperative provide the right label format, e.g. ‘%d’ for ints, otherwise you might end up with weird errors.
- Parameters
block (Block) – A block structure.
x (int) – Position X where the component should be placed.
y (int) – Position Y where the component should be placed.
width (int) – Width of the trackbar.
value ([number]) – Array or list of numbers whose first position, i.e.
value[0], will be used to store the current value of the trackbar. It will be modified when the user interacts with the trackbar. Any numeric type can be used, e.g. int, float, long double, etc.params (TrackbarParams) – Describe the inner parts of the trackbar component.
- Returns
The current value.
- Return type
float
-
trackbarForceValuesAsMultiplesOfSmallStep(params, value)[source]¶ Correct the value when the trackbar allows only discrete changes (
cvui.TRACKBAR_DISCRETE)- Parameters
params (TrackbarParams) – Describe the inner parts of the trackbar component.
value ([number]) – Array or List of numbers whose first position, i.e.
value[0], will be used to store the current value of the counter.
-
trackbarXPixelToValue(params, bounding, pixelX)[source]¶ Calculate the value from the position of the trackbar.
- Parameters
params (TrackbarParams) – Describe the inner parts of the trackbar component.
bounding (Rect) – The area of trackbar.
pixelX (int) – The position in the trackbar.
- Returns
The current value.
- Return type
float
-
trackbarValueToXPixel(params, bounding, value)[source]¶ Calculate the position in the trackbar from the current value.
- Parameters
params (TrackbarParams) – Describe the inner parts of the trackbar component.
bounding (Rect) – The area of trackbar.
value (float) – The current value in the trackbar.
- Returns
The position in the trackbar.
- Return type
int
-
colorpalette(block, x, y, bgr, width, height, params)[source]¶ Display a color palette using
trackbar.- Parameters
block (Block) – A block structure.
x (int) – Position X where the component should be placed.
y (int) – Position Y where the component should be placed.
bgr (list) – Array or list of BGR color.
width (int) – Width of the each trackbar and the example image.
height (int) – Height of the example image.
params (TrackbarParams) – Describe the inner parts of the trackbar component.
- Returns
The current BGR value.
- Return type
tuple
-
iarea(x, y, width, height)[source]¶ Create an interaction area that reports activity with the mouse cursor. The tracked interactions are returned by the function and they are:
- Parameters
x (int) – Position X where the interactive area should be placed.
y (int) – Position Y where the interactive area should be placed.
width (int) – Width of the interactive area.
height (int) – Height of the interactive area.
- Returns
- An integer value representing the current state of interaction with the mouse cursor. It can be
cvui.OUTwhen the cursor is not over the iarea.cvui.OVERwhen the cursor is over the iarea.cvui.DOWNwhen the cursor is pressed over the iarea, but not released yet.cvui.CLICKwhen the cursor clicked (pressed and released) within the iarea.
- Return type
int
Create a bottun using
widthandheight.- Parameters
block (Block) – A block structure.
x (int) – Position X where the component should be placed.
y (int) – Position Y where the component should be placed.
width (int) – Width of the button.
height (int) – Height of the button.
label (str) – Text displayed inside the button.
color (tuple) – Button color.
updateLayout (bool) – Whether updates layot or not.
- Returns
Whether the button was clicked or not.
- Return type
bool
Create a bottun using
buttonWHby calculatingwidthandheightfromlabel.- Parameters
block (Block) – A block structure.
x (int) – Position X where the component should be placed.
y (int) – Position Y where the component should be placed.
label (str) – Text displayed inside the button.
color (tuple) – Button color.
- Returns
Whether the button was clicked or not.
- Return type
bool
Create a bottun using images.
- Parameters
block (Block) – A block structure.
x (int) – Position X where the component should be placed.
y (int) – Position Y where the component should be placed.
idle (np.ndarray) – An image that will be rendered when the button is not interacting with the mouse cursor.
over (np.ndarray) – An image that will be rendered when the mouse cursor is over the button.
down (np.ndarray) – An image that will be rendered when the mouse cursor clicked the button (or is clicking).
- Returns
Whether the button was clicked or not.
- Return type
bool
-
image(block, x, y, image)[source]¶ Display an image (np.ndarray).
- Parameters
block (Block) – A block structure.
x (int) – Position X where the component should be placed.
y (int) – Position Y where the component should be placed.
image (np.ndarray) – Image to be rendered in the specified destination.
-
window(block, x, y, width, height, title)[source]¶ Display a window (a block with a title and a body).
- Parameters
block (Block) – A block structure.
x (int) – Position X where the component should be placed.
y (int) – Position Y where the component should be placed.
width (int) – Width of the window.
height (int) – Height of the window.
title (str) – Text displayed as the title of the window.
-
rect(block, x, y, width, height, borderColor, fillingColor)[source]¶ Display a filled rectangle.
- Parameters
block (Block) – A block structure.
x (int) – Position X where the component should be placed.
y (int) – Position Y where the component should be placed.
width (int) – Width of the rectangle.
height (int) – Height of the rectangle.
borderColor (uint) – Color of rectangle’s border in the format
0xRRGGBB, e.g.0xff0000for red.fillingColor (uint) – Color of rectangle’s filling in the format 0xAARRGGBB, e.g. 0x00ff0000 for red, 0xff000000 for transparent filling.
-
drawingpad(block, x, y, image, color=16777215, fillingColor=0, thickness=3)[source]¶ Create a drawing pad.
- Parameters
block (Block) – A block structure.
x (int) – Position X where the component should be placed.
y (int) – Position Y where the component should be placed.
image (np.ndarray) – Image to be rendered in the specified destination.
color (uint) – Color of the line in the format
0xRRGGBB, e.g.0xff0000for red.thickness (int) – Thickness of the lines used to draw a line.
fillingColor (uint) – Color of filling in the format 0xAARRGGBB, e.g. 0x00ff0000 for red, 0xff000000 for transparent filling.
- Returns
The current
image.- Return type
np.ndarray
-
sparkline(block, x, y, values, width, height, color)[source]¶ Display the values of a vector as a sparkline.
- Parameters
block (Block) – A block structure.
x (int) – Position X where the component should be placed.
y (int) – Position Y where the component should be placed.
values ([number]) – Array or List containing the numeric values to be used in the sparkline.
width (int) – Width of the rectangle.
height (int) – Height of the rectangle.
color (uint) – Color of sparkline in the format
0xRRGGBB, e.g.0xff0000for red.
-
-
class
pycharmers.opencv.cvui.Render[source]¶ Bases:
objectClass that contains all rendering methods.
-
text(block, text, position, fontFace=0, fontScale=0.4, color=13553358, thickness=1, lineType=8)[source]
-
counter(block, shape, value, fontFace=0, fontScale=0.4, color=13553358, thickness=1, lineType=16)[source]
-